A Guide for Beginners
Solo wins aren’t earned. They’re gifted by people who throw due to frustration, trivial errors, or just not knowing the positions needed to stop one.
I’m writing this article in the hope that I might see fewer of these completely preventable solos. Although I write from the perspective of Gunboat Diplomacy, many of the positional and logistical considerations covered are relevant to Press Diplomacy as well.[1]And theoretically relevant to face to face Diplomacy, although FTF is rarely played out to a true endgame. Further, should a solo threat emerge, the match is likely to have at least one veteran player who can easily turn it back if less-experienced players are willing to follow their lead. Solos … Continue reading
This article shows several of the major 17-supply-centre stalemate lines that you may use to stop a solo. It’s not comprehensive; variations exist here and there, including some that secure 18 or 19 centres. Often this is done by mixing and matching from the motifs shown below. For example, it’s possible for defenders who have secured all of the north to also block a southern solo candidate from Moscow and Warsaw. Stalemate lines that secure more than 17 centres are more important if you’re playing a scoring system that discriminates between centre count within a draw, such as Tribute or sum-of-squares.
This article assumes you are familiar with concepts from BrotherBored’s Gunboat Solo Win Guides, such as the 17-17 centre split between “the north” and “the south”.[2]I use ‘north’ interchangeably with ‘west’ and ‘south’ with ‘east’, depending on which looks more applicable for the given line.
Without trying to cover too much ground, there are a few concepts that apply no matter which line you’re aiming at:
Seeing a line doesn’t mean getting there in time.
St. Petersburg and Munich (without Berlin) can’t be held from the south in the long run…but in the long run, we are all dead. Holding a centre means different things in defensive and offensive contexts; for the former, a centre needs to be perpetually defensible against all attacks, while for the latter a centre only needs to be held for long enough. To stop a solo, you must ensure that the solo candidate is unable to hold crucial centres in the offensive sense. It doesn’t matter if Austria can’t hold St Petersburg in the long run, for example, if they get it on the turn that they hit 18. This is especially dangerous with a centre like Munich, which can be held alone from the south for many years with control over Piedmont and good guessing in the Prussia/Livonia area. The solo candidate has the luxury of time to grind out the last SC. You as a defender don’t.[3]As an extreme example, there exists a 17-17 stalemate that splits the map into vertical halves. It includes Sweden, St. Petersburg, Berlin and Munich as eastern centres in exchange for Tunis and mainland Italy as western centres. This line requires a full 17 units of the right type in precise … Continue reading
A power that takes over more than half their side is going to get the rest.
Diplomacy is characterised by a snowball effect. Each centre you get results in another build that allows you to bring more force to bear on your targets which makes it easier to get more centres, and so on. Somebody who has taken over enough of the north or the south reaches a tipping point where they can grind down the rest. This tipping point comes much sooner in Gunboat than in Press. With the benefit of verbal communication, players can band together to roll back a dominant power. In Gunboat, such an attempt is often futile as minor powers have no way of coordinating tactics in a situation where close coordination would be their sole chance at resistance. It takes only nine centres to achieve a majority on either side of the main stalemate line. A power that is on or about to get nine centres may be in a position of effectively controlling nearly enough centres to solo. The messier the rest of the board is, the more this power should be regarded as a credible solo threat.[4]Some players advocate the heuristic that the leader reaching 12 centres is the time for the board to cease side conflicts and unite to form a stalemate line, if it hasn’t already done so. While the immediacy of the solo threat depends on a host of other factors, it’s never premature to … Continue reading
The higher the number of defenders, the greater the tactical challenge.
This is obvious in the trivial sense that given lack of verbal communication, you’ll have a harder time coordinating with more people. Less trivially, consider that each unit on a stalemate line is ‘paid for’ by a centre belonging to its owner. Depending on each power’s strength and the geography of the required line, there may be vital unfilled positions along the stalemate that can only be occupied by one power backfilling into the SC of their ally on the front line—but this would force their ally to disband, thus ruining the line.[5]One example is the main stalemate line held from the east, without Tuscany: Italy owns VEN, ROM, NAP and TUN, with units in VEN, ROM, TYS and TUN. To close the line, another fleet is required in Naples to support TYS. But the only fleet that can move to Naples is a Turkish fleet in ION, which if it … Continue reading This miserable catch-22 arises frequently when the defenders consist of many smaller powers. You can reduce the chance of facing this situation by eliminating some of your neighbours ahead of time, or by ceding centres early on to powers that you foresee needing more units for this reason[6]This is done by writing frivolous orders supporting other powers’ units into your centre. It carries its own risks and will unfortunately fail if you try it on allies who don’t understand what you’re doing.. Should you be left with many small powers on a demanding line, the resultant position will probably require some risks and/or sophisticated pass-throughs[7]A pass-through is when a power enters their ally’s centres in spring to move past it in fall into a strategically valuable position. to shore up.
If you aren’t needed on the line, back off.
This most commonly applies to a small-but-not-dying Turkey when there is a western solo threat, and can also be relevant for England. In many matches, players who are aware of a solo threat and how to stop it don’t act in time to do so because the corner power behind them fails to assure the other defenders that the corner power won’t dot grab.[8]I’ve seen France on 12 with Tunis and Turkey still vacating ION to force their way into Greece and Serbia. Don’t be that person. It doesn’t matter whether you end on 4 or 5 if somebody else ends on 18. A good way of showing your sincerity is to move units as far away from your allies as you can (without risking your own survival).[9]This can be hard to time to ensure your survival. But because lines held from the east often require all or almost all of Austria/Italy/Russia’s remaining units, Turkey can be quite safe leaving units in SYR, EAS/SMY, and CON/ANK as a defensive measure.
Raiders ruin defensive stalemate lines.
A raider behind the defenders’ line can cut vital supports, allowing the solo candidate to break through. On the other hand, a lone raider behind the offensive line will most likely only delay the solo threat, and is ultimately irrelevant to the defensive effort; any centre occupied by that type of raider can’t be relied upon as one of the defenders’ 17.
The Main Stalemate Line (MSL)
From the north
Likely used against: Turkey, Austria, Italy
Required components:
- Fleet MAO supported by Fleet POR, NAO, IRI, ENG or BRE
- Unit SPA supported by Unit GAS or POR
- Unit MAR supported by Army GAS or BUR
- Army MUN supported by two of Army BUR, RUH and KIE
- Unit BER supported by Unit KIE or BAL
- Unit STP supported by Unit BOT, FIN, NWY or BAR
How to form it:
- This is the easiest of all lines to form.
- Only 13 units are required in total and most are indiscriminate of type. The line can be held with as few as four northern armies (useful when the northern powers have amassed a large number of fleets to fight each other).
- All the critical territories can be supported in multiple ways, offering plenty of flexibility and a large margin of error to northern powers getting into position.
- Once the solo threat is realised, it typically takes a maximum of one or two turns to assemble the line, since stalemate unit locations are in the vicinity of where those units would normally be anyway.
- Beware of a southern power capturing Munich long before they’ve finished their conquest of the south. While Munich cannot be stalemated from the south, it can be defended for a long time, making it a top option for southern powers’ 18th centre. Securing Munich is therefore a priority for northern defenders seeking to force a draw.
From the south
Likely used against: France, England
Required components:
- Army MOS supported by Army SEV
- Army WAR supported by Army GAL and Army UKR
- Army BOH supported by Army VIE
- Army TYR supported by Army TRI
- Unit TUN supported by Fleet ION
If you have Tuscany:
- Fleet TYS supported by Fleet ROME or NAP
- Unit TUS supported by Army VEN
If you don’t have Tuscany:
- Fleet TYS supported by Fleet ROME and NAP
- Unit VEN supported by Unit ADR or APU
How to form it:
- Due to the specificity and number of units required, it is essential for the defenders to act early, giving particular care to the Tunis area.
- If you have Tuscany, you only need three fleets total. You will need four fleets if your line does not include Tuscany. This is important when the south has a dearth of fleets, which is likely if Austria/Russia are the dominant southern powers or Italy/Turkey have built mostly armies.
- The decision to convoy an army to Tunis rather than sending a fleet has to be made early on in the line-forming effort. Trying to hold Tunis with a fleet when the south lacks sufficient fleets may cause your line to break years later.
- Don’t attempt to hold or advance into PRU or LIV. Sending units there risks having them force-disbanded when they have nowhere to retreat—lethal if your rebuilds are too far away to consolidate the line before the northern power breaks through.
- Beware of the northern power going for Tunis long before they’ve finished their conquest of the north. For England and France, the ideal opportunity to snipe Tunis is often when they’re on 8 or 9, especially when they’re on the verge of eliminating the other and only have Germany to contend with (a fight in which 9-centre England or France usually enjoys the advantage).
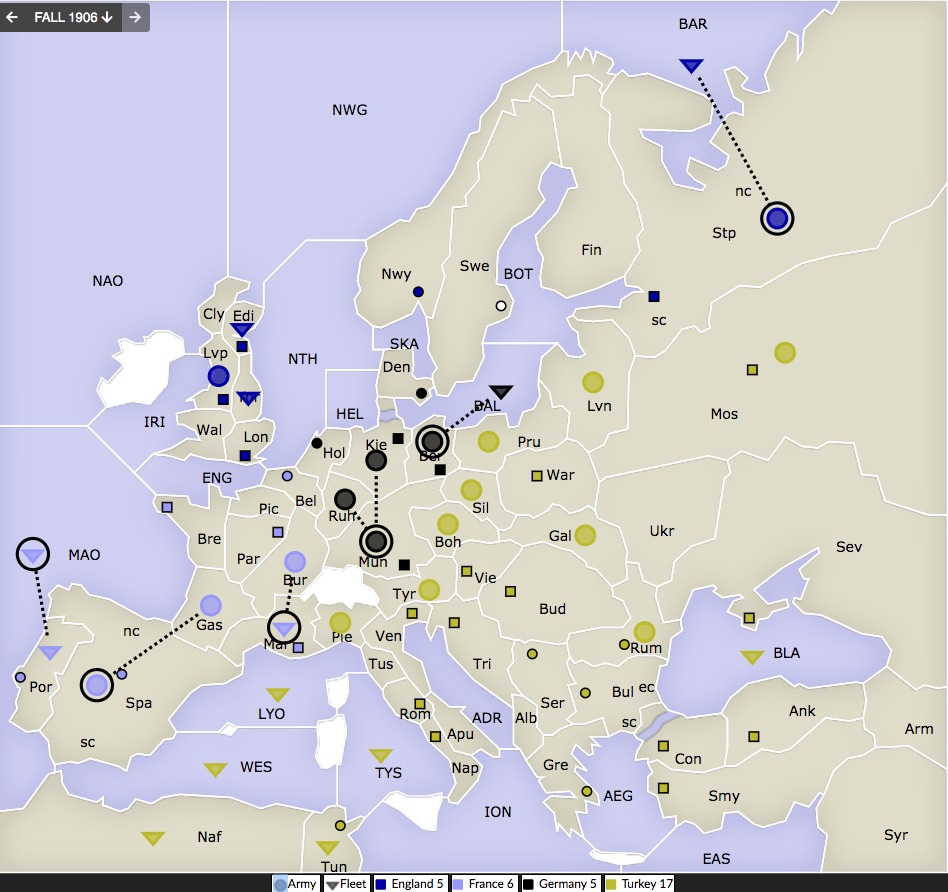
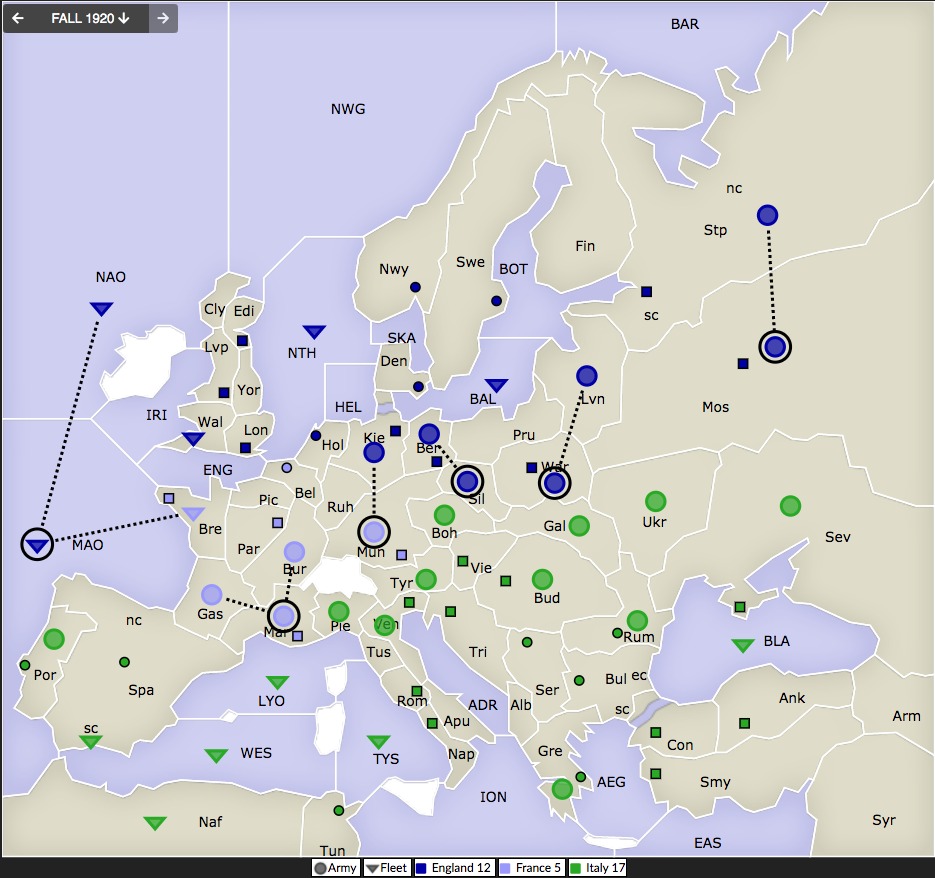
The Berlin Line
From the west
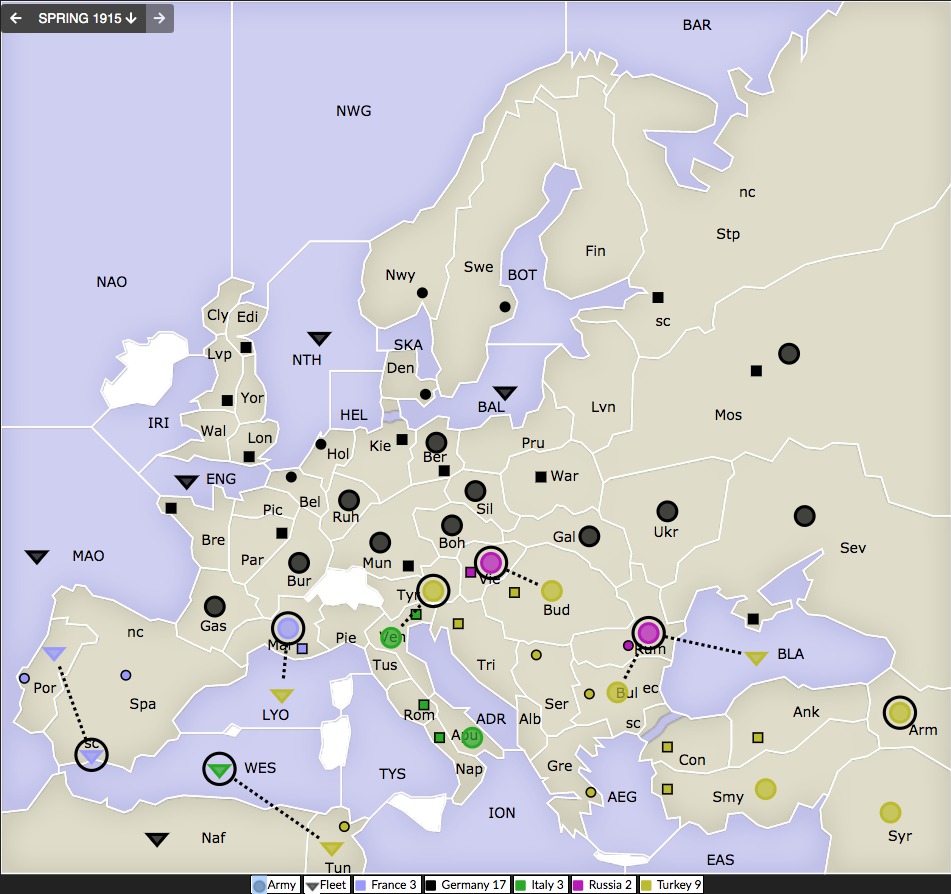
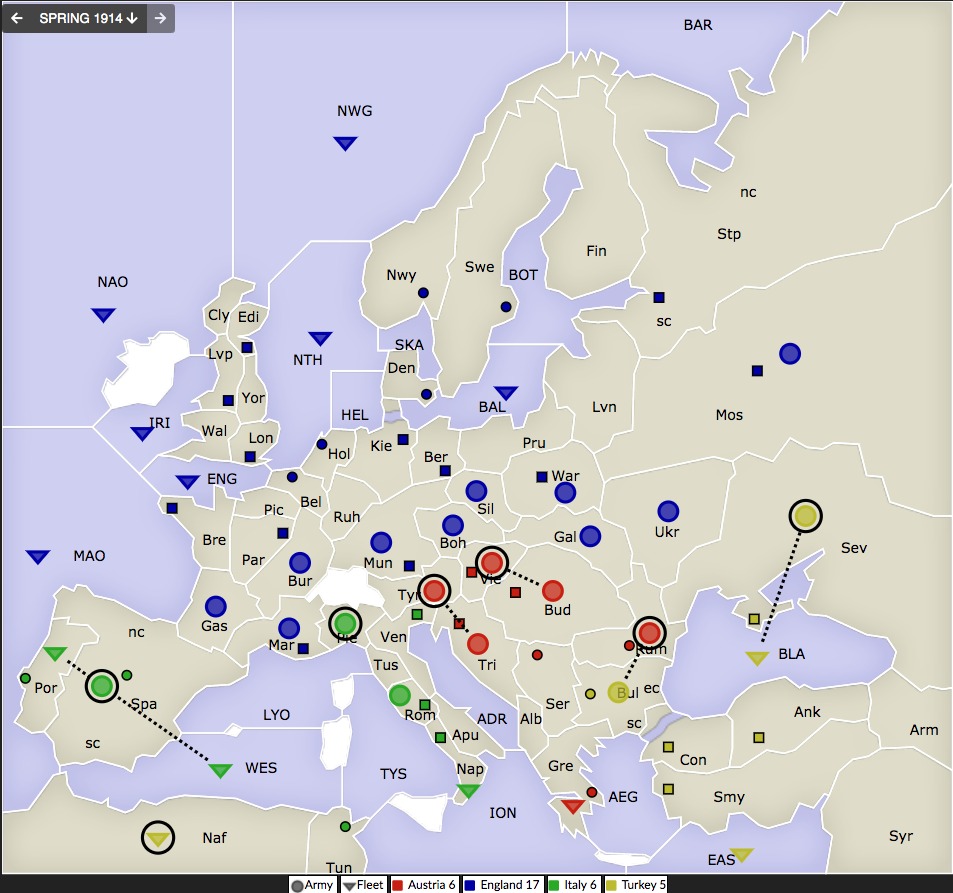
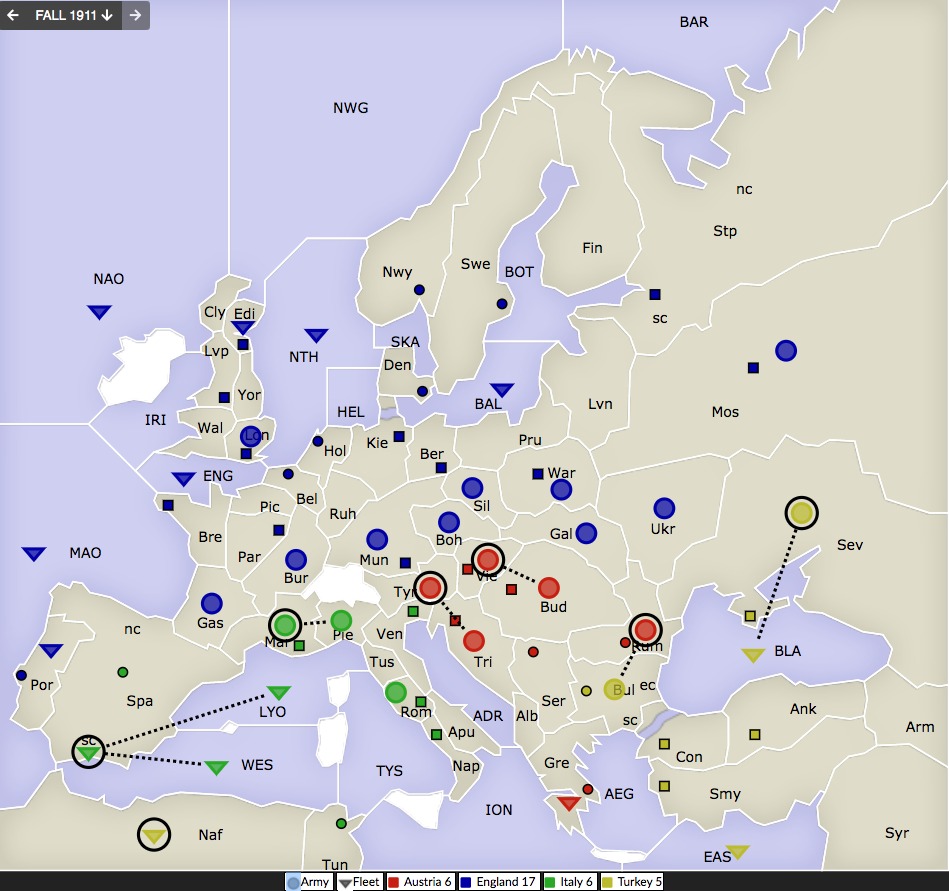
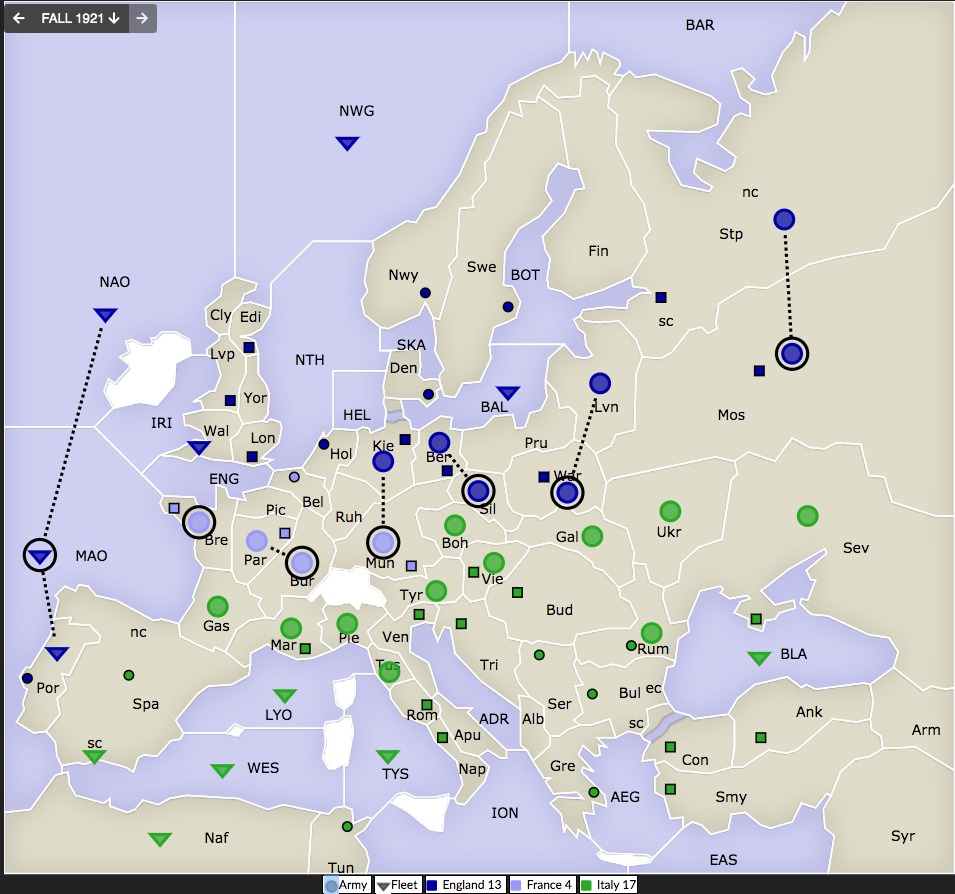
Likely used against: Austria, Turkey[10]This line is probably rare against Turkey, but the image above is adapted from a real gunboat that ended in 1934, which I thought was too gorgeous not to use as an illustration. Especially with how Italy (incidentally a Diplomacy world champion) managed to survive on two centres—the two most … Continue reading
Required components:
- Unit TUN supported by Unit NAF
- Fleet WES supported by Fleet SPA (sc)
- Unit MAR supported by Army GAS
- Army MUN supported by Army BUR, RUH and KIE
- Unit STP supported by Unit BOT, FIN, NWY or BAR
How to form it:
- From the west, the Berlin line is easily formed and requires only 12 units if the eastern power has no northern fleets.[11]If the eastern power has northern fleets parked along BER/PRU/LVN, i.e. is Russia, the stalemate can be achieved by mandating fleets in BOT and BAL, the latter supported by Fleet DEN or SWE as needed.
- The Berlin line is more often applicable to stop France than anyone coming from the east; it’s uncommon that the western defenders are able to lock down TUN but not BER.
- There are a number of stalemates and near-stalemates that set the line further eastwards in the Western Mediterranean area; the configuration given here is the minimal such line and relatively easy to retreat to at any point if you have fleets pushed out. Just pay attention and make sure you don’t get units force-disbanded.
- The main challenge arises in sending fleets to lock down Tunis fast enough, which is harder if the solo candidate is Turkey than if it is Austria.
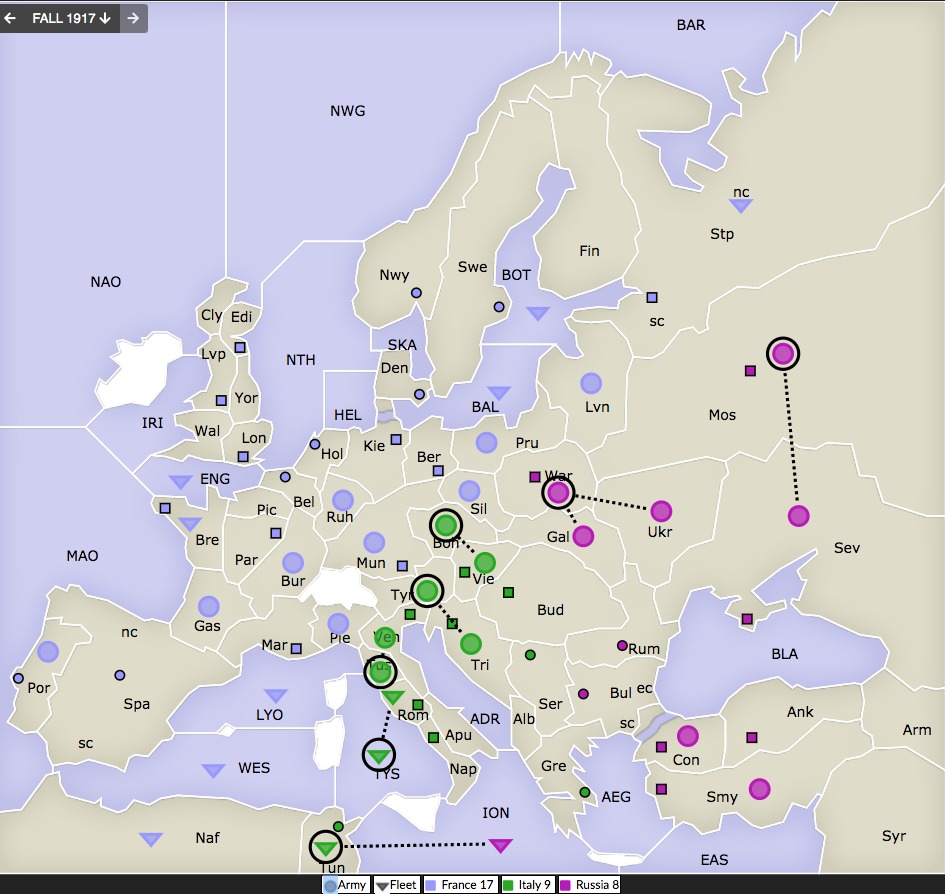
From the east

Likely used against: France
Required components:
- Fleet ION supported by one adjacent fleet
- Unit NAP[12]Can be and often is the support for ION, but this is not possible if NAP is an army. ION can as easily be supported from elsewhere, leaving NAP free to instead act as a support for ROM.
- Unit ROM supported by Unit NAP or APU
- Unit VEN supported by Unit TRI, APU or ADR
- Army TYR supported by Army BOH
- Unit BER supported by Unit PRU and Army SIL[13]The units in BER, PRU and LVN are most likely to be armies, but it isn’t impossible for these units to be fleets, hence the lack of specification.
- Unit LVN supported by Army WAR and MOS
How to form it:
- This is a challenging line, but ideal when the south lacks naval strength; it can be held with as few as two fleets, one in ION and one supporting ION.
- The north is especially vulnerable. It requires a large number of units in locations with not enough centres to sustain them. The conditions that enable this line are most common when Russia is the dominant southern power or loaning centres from southern allies who recognise the solo threat.
- The line can be safely shifted forward to TUS, stalemated by support from VEN and ROME, or PIE, stalemated by support from TUS and VEN. This is materially indistinguishable to the line shown above, but means that you don’t need to worry about retreating behind the line as you do with positions like MSL from the south.
- Note that Munich can’t be stalemated from the south without Berlin. Munich can be held for a long time and is therefore crucial for a single southern power making a solo run, but from the perspective of defence a sufficiently-determined northern power who has units to spare will eventually break through. The implication is that if you’re on the south with no chance to win and you’re seeking to end the game at a stalemate, the position you need to work towards is this one with Berlin, and Munich is a bonus.[14]If you have Berlin locked down, you can sometimes extend the line to include Munich as well.
The Sevastopol Line
From the north
Likely used against: Italy
Required components:
- Fleet NAO
- Fleet IRI
- Unit BRE supported by Fleet ENG
- Army BUR supported by Army PAR
- Army BOH supported by Army MUN
- Army GAL supported by Army SIL and WAR
- Unit SEV supported by Army UKR and MOS
How to form it:
- This is a challenging line. The north needs a minimum of ten armies and thus can afford a maximum of seven fleets, when strategic considerations normally incentivise northern powers to build large numbers of fleets.
- Most of the armies have to be sent deep into the east in an area without enough centres to sustain those units, necessitating cooperation between northern powers who recognise the solo threat. This becomes more problematic when the east is divided between multiple small powers who must disband as the solo candidate pushes them out of their southern centres, losing the units needed to hold up the line.
- If securing all the required eastern territories becomes impossible, it may be time to retreat to WAR-MOS and try to stalemate at an Iberian line.
- The Sevastopol line is the only 17-centre northern stalemate that gets away with the southern power controlling MAO.
From the south
Likely used against: Germany, England
Required components:
- Unit SPA supported by Unit POR
- Fleet WES supported by Fleet TUN
- Unit MAR supported by Unit PIE or Fleet LYO
- Army TYR supported by Army PIE, VEN or TRI[15]TYR can be turned over to the northern power if the south has units in LYO, PIE and VEN, and an Army TRI supporting VIE, but in practice conceding TYR often allows the northern power a shot at MAR, TRI or VIE. It’s often easier and requires fewer units to hold the line at TYR.
- Army VIE supported by BUD
- Unit RUM supported by two of Army SER, Fleet BLA, Unit BUL[16]BUL (ec) if a fleet, for obvious reasons
- Unit ARM
How to form it:
- This line is most commonly applicable against Germany or an England who first annexed the north in an England/France alliance before turning on France. Either scenario gives the defenders a relatively long time to react. This line is straightforward, short of blunders or intentional throwing.
- Beware of Germany going for VIE or MAR/Iberia long before they’ve finished their conquest of the north. These centres can be stalemated or defended for a long time from the north, so it is hard to rely on them as part of your stalemate line once Germany has taken them.
- Once it becomes apparent that England/Germany is going to overpower France and is making a solo run, France looking to survive into a draw must prioritise POR, SPA and MAR. In fact, France can pretty much retreat into those three spaces and write ‘POR support-hold SPA’ for the rest of the match, relying on other southern powers to send naval backup. Diverting units to try to hold PAR or BRE risks trapping French units out of position and unable to reach POR/SPA/MAR in time. This may result in France’s elimination, loss to a solo, or both.
Iberian Lines
Several stalemates run through Iberia and MAO. The most common scenarios that are relevant in solo stopping come about when southern defenders have secured Sevastopol and so can afford to lose one of POR or MAR (unlike the Sevastopol line, or when the southern solo threat has taken Sevastopol and so the north needs to hold one more centre in the west).
From the south
Likely to be used against: Germany, England
Required components:
- Unit SEV supported by Fleet BLA or Unit ARM
- Unit RUM supported by Unit BUL or Army SER
- Army VIE supported by Army BUD
- Army TYR supported by Army VEN or Army TRI
Holding Portugal
- Unit SPA supported by Unit POR and Fleet WES
- Unit NAF
- Unit PIE
- Fleet LYO if the northern power has Fleet MAR
Holding Marseilles
- Unit MAR supported by Unit PIE
- Unit SPA supported by Fleet LYO and Fleet WES
- Unit NAF
How to form it:
- The two variations are very similar and many scenarios will find you with the option of stalemating all three of POR, SPA and MAR against the northern power, which is required if you lose SEV (refer to the Sevastopol line).
- Like the Sevastopol line, this stalemate is most commonly applicable against Germany or England and in situations that give the defenders a fair amount of time to react.
- The most challenging part is sending enough fleets to take and/or secure the necessary parts of southern French territory, especially if multiple nations need to coordinate fleets.
From the north
Likely to be used against: Italy
Required components:
- Army SIL supported by Army BER or Army PRU
- Army MUN supported by Army RUH or Army KIE
If you have Ukraine:
- Army UKR supported by Army WAR and Army MOS
If you don’t have Ukraine:
- Army MOS supported by Army STP or Army LVN
- Army WAR supported by Army PRU or Army LVN
Holding Portugal
- Army BUR supported by Army PAR
- Unit BRE
- Fleet MAO supported by two of Fleet NAO, IRI, ENG, BRE and POR
- Unit POR
Holding Marseilles
- Unit MAR supported by Army GAS and Army BUR
- Fleet MAO supported by two of Fleet NAO, IRI, ENG, and BRE
How to form it:
- Like the Sevastopol line, logistical difficulties in getting armies into the east fast enough require quick action to deny the solo.
- The line requires one fewer unit if the defenders occupy Ukraine, which is more commonly the way this line successfully forms. A competent Russia owning just WAR, MOS and STP can thus lock down the east alone if left unmolested by the dominant Atlantic power(s).[17]The WAR-UKR-MOS configuration is one of the most powerful ‘local stalemates’ on the board and an excellent tool for Russia seeking to hang on for a draw. A strong southern power’s growth can be effectively bottled up just by Russia retreating to WAR-UKR-MOS and support holding for … Continue reading
Conclusion
Stopping a solo, especially in Gunboat, is hard. Defenders need to make decisions sometimes years in advance that will influence which lines they can form or whether they’re able to form one at all. A defending coalition is as strong as its weakest member: all it takes is one inaccuracy to concede the match.
Fortunately, most lines are not that materially demanding. If all defenders can get on roughly the same page, even convoluted positions can quickly solidify into unassailable lines. I hope that with awareness of the key ideas and common blunders covered in this article, players might more frequently experience the great feeling that comes from uniting to stop a solo.
Footnotes
| ↑1 | And theoretically relevant to face to face Diplomacy, although FTF is rarely played out to a true endgame. Further, should a solo threat emerge, the match is likely to have at least one veteran player who can easily turn it back if less-experienced players are willing to follow their lead. Solos are exceedingly rare in FTF and almost always enabled by the presence of multiple beginners and/or a spiteful player intentionally throwing. |
|---|---|
| ↑2 | I use ‘north’ interchangeably with ‘west’ and ‘south’ with ‘east’, depending on which looks more applicable for the given line. |
| ↑3 | As an extreme example, there exists a 17-17 stalemate that splits the map into vertical halves. It includes Sweden, St. Petersburg, Berlin and Munich as eastern centres in exchange for Tunis and mainland Italy as western centres. This line requires a full 17 units of the right type in precise locations to hold, and for all intents and purposes would be unachievable in the vast majority of Press games, let alone Gunboat. |
| ↑4 | Some players advocate the heuristic that the leader reaching 12 centres is the time for the board to cease side conflicts and unite to form a stalemate line, if it hasn’t already done so. While the immediacy of the solo threat depends on a host of other factors, it’s never premature to plan out how you intend to stop a 12 centre power from reaching 18. Sometimes that may even be too late, if the power in question has secured a centre across the line you’ll want to use against them. |
| ↑5 | One example is the main stalemate line held from the east, without Tuscany: Italy owns VEN, ROM, NAP and TUN, with units in VEN, ROM, TYS and TUN. To close the line, another fleet is required in Naples to support TYS. But the only fleet that can move to Naples is a Turkish fleet in ION, which if it moved to Naples would force Italy to disband one of the four crucial units. Another common scenario is in holding the Berlin line from the east: Russia owning Berlin, Warsaw, Sevastopol and Moscow has pushed their armies up to BER, PRU, LVN and MOS. Now an army in Warsaw is needed to reinforce LVN—but sending one there would cause Russia to have to disband a vital unit. |
| ↑6 | This is done by writing frivolous orders supporting other powers’ units into your centre. It carries its own risks and will unfortunately fail if you try it on allies who don’t understand what you’re doing. |
| ↑7 | A pass-through is when a power enters their ally’s centres in spring to move past it in fall into a strategically valuable position. |
| ↑8 | I’ve seen France on 12 with Tunis and Turkey still vacating ION to force their way into Greece and Serbia. Don’t be that person. It doesn’t matter whether you end on 4 or 5 if somebody else ends on 18. |
| ↑9 | This can be hard to time to ensure your survival. But because lines held from the east often require all or almost all of Austria/Italy/Russia’s remaining units, Turkey can be quite safe leaving units in SYR, EAS/SMY, and CON/ANK as a defensive measure. |
| ↑10 | This line is probably rare against Turkey, but the image above is adapted from a real gunboat that ended in 1934, which I thought was too gorgeous not to use as an illustration. Especially with how Italy (incidentally a Diplomacy world champion) managed to survive on two centres—the two most important centres on this map as well—showing the power of occupying key positions! |
| ↑11 | If the eastern power has northern fleets parked along BER/PRU/LVN, i.e. is Russia, the stalemate can be achieved by mandating fleets in BOT and BAL, the latter supported by Fleet DEN or SWE as needed. |
| ↑12 | Can be and often is the support for ION, but this is not possible if NAP is an army. ION can as easily be supported from elsewhere, leaving NAP free to instead act as a support for ROM. |
| ↑13 | The units in BER, PRU and LVN are most likely to be armies, but it isn’t impossible for these units to be fleets, hence the lack of specification. |
| ↑14 | If you have Berlin locked down, you can sometimes extend the line to include Munich as well. |
| ↑15 | TYR can be turned over to the northern power if the south has units in LYO, PIE and VEN, and an Army TRI supporting VIE, but in practice conceding TYR often allows the northern power a shot at MAR, TRI or VIE. It’s often easier and requires fewer units to hold the line at TYR. |
| ↑16 | BUL (ec) if a fleet, for obvious reasons |
| ↑17 | The WAR-UKR-MOS configuration is one of the most powerful ‘local stalemates’ on the board and an excellent tool for Russia seeking to hang on for a draw. A strong southern power’s growth can be effectively bottled up just by Russia retreating to WAR-UKR-MOS and support holding for years, even to the end of the game. No progress is possible from the south against three armies arranged there unless the southern power gets into Silesia, which is usually not in a viable Germany’s interest to allow. |
Thank you for helping me stop solos!
Nice article. An excellent and focused update to previous attempts to classify and document stalemate lines. Is it possible to include the details of the variation of the Main Stalemate Line (from the south) where you control Berlin but not Tunis?
If I understand you correctly, I believe I’ve written about this as the Berlin line!
Oh yes!
Wanted to say thanks for this – I had a game recently where I wanted to describe a stalemate line (the “From the North” version of the Sevastopol line) and it was a lot nicer to point the other player at this page for the visual aid rather than only describe it in text. I couldn’t seem to find that line in other online resources (although I’m sure its somewhere) so this was nice.