
Introduction
Who are you and why should I read your Diplomacy articles?
I’ve been a Diplomacy player off-and-on for 11 years. Most of my play experience comes from webDiplomacy, the premier online Diplomacy host on the Internet.[1]In this author’s not-at-all humble opinion. I have had a successful career, amassing a 24% win rate in Classic, and I currently sit in the site’s all-time “Ghost Ratings”[2]An Elo-derived system for rating Diplomacy players. anywhere from rank #9 – #14.[3]The site recently fully integrated Ghost Ratings, and there are some consistency issues being resolved that make me unsure what the exact rank is at the time of this writing. I’ve had a wonderful time playing and learning the game, and I’ve built up a lot of experience and knowledge. It is, in my view, long since time to give that back to the Diplomacy community, one of the best hobbies on Earth.
What do I need to know to use this guide?
This guide assumes you have a solid grasp of basic tactical fundamentals.[4]You can find a superb visual index to the tactical basics at webDiplomacy here. Their Diplomacy Adjudicator Test Cases page covers all possible situations. If you have a decent grasp of the basics and use these visuals, you should be fine.
This guide also assumes basic knowledge of stalemate lines. Stalemate lines are sets of orders and units which can defend a self-sufficient number of centers indefinitely against all possible enemy attacks. Stalemate lines define Diplomacy; many stalemate lines exist which protect enough centers to deny any player a victory, thus forcing the game to end in a draw. BrotherBored has, in my estimation, the Internet’s best visual index to stalemate lines, created by seren. If you use this reference, you’ll have no problem following along.
What Diplomacy variants is this guide for?
This guide is for the Classic version of Diplomacy. I will specifically say, where appropriate, whether I am discussing “full press”[5]”Press” is a hobby nickname for verbal or written communication between players. “Full press” allows private and public communication. or “no press”[6]Perhaps better known as gunboat. strategy.
However, one insight I have picked up from extensive play of both variants of Classic is that strategy concerns for press and no press often overlap significantly. Press is a game-changing and game-defining tool. But it does not fundamentally change a country’s tactical and strategic concerns; those are defined by the fixed design of the board. In fact, press players often benefit from exposure to no press strategy. The tenets of no press strategy set the “rules of engagement” at the start of a match. Thus, they inform the players of the items they should discuss and the challenges they may strive to overcome.
Accordingly, I will discuss these two variants as one, with specific sidebars as appropriate.
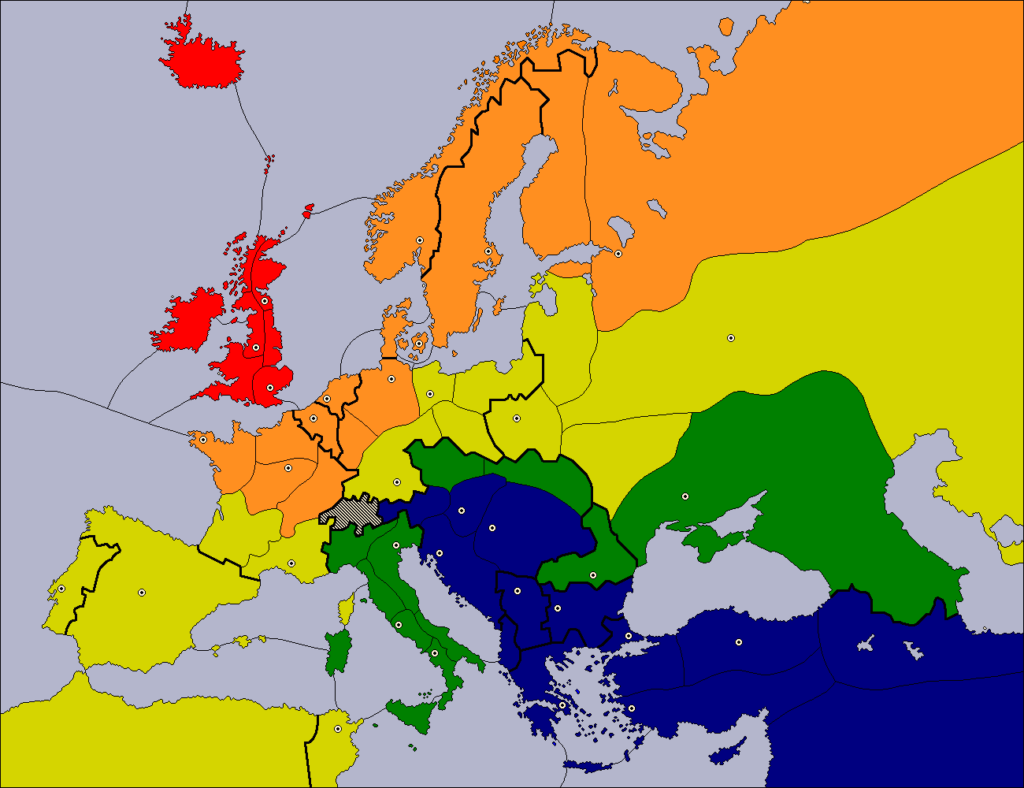
Heat Maps To Victory
I quite like BrotherBored’s maps illustrating solo victory routes for each Classic power in gunboat. Here is a link to those maps (and an excellent analysis of the key centers).
I largely endorse the superb analysis already done by BrotherBored[7]And not just because he’s been kind enough to host my guide! and hope that my slightly different takes will complement his analysis and give you, the reader, an even more potent grasp of what you must do to win.
I’ve designed “heat maps” that communicate specific information about the provinces. As province color shifts from red to blue, the province becomes more difficult for a country to acquire. That scheme lets you instantly see what areas should be your focus.
The rubric
Red spaces are those that the power owns at game start.
Orange spaces are those that the power will need to control in every foreseeable victory; it’s possible to win without them but would require extremely unlikely circumstances.
Yellow spaces represent the furthest extent of the power’s expansion in a normal game; the power need not capture all yellow spaces, but natural expansion will lead to capturing most of them.
Green spaces are “flex” spaces that a power could capture en route to a solo in games where that power maintains a long-term alliance with a neighboring power; these spaces are beyond most ordinary stalemate positions and distant from the power, but a dedicated alliance between two neighbors can push past those stalemate positions and reach those more distant spaces.
Blue spaces are unreachable in all but the strangest of circumstances.
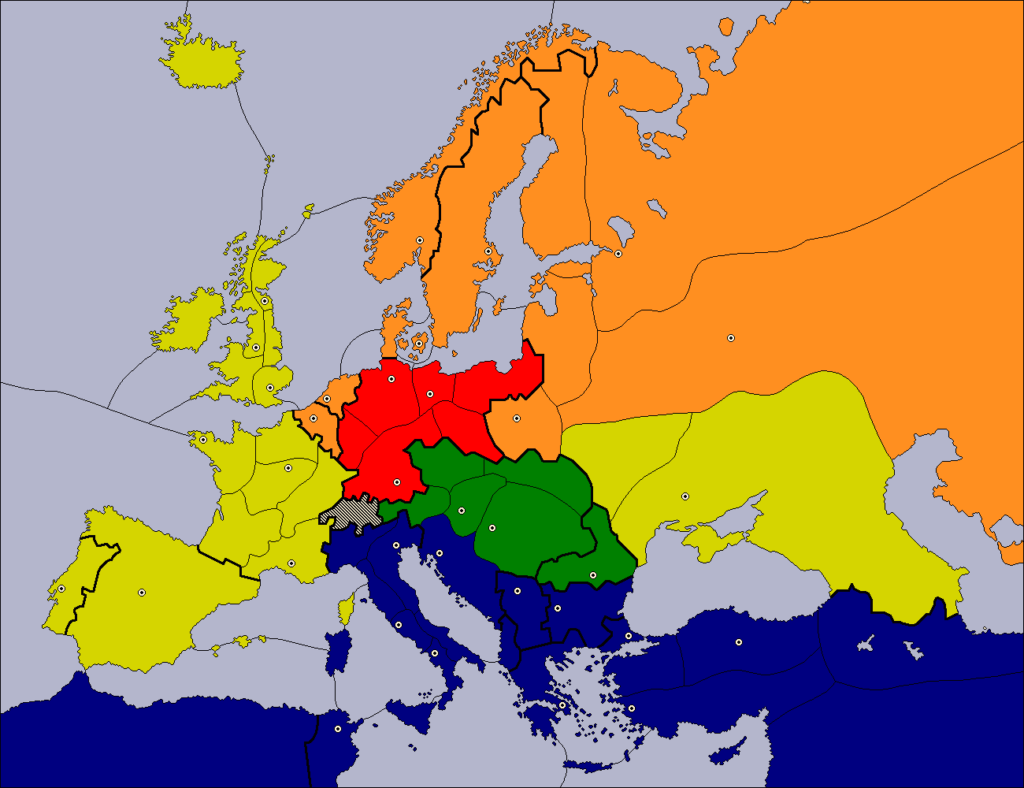
England
England has the same strategic skeleton every game. First, negotiate an alliance with one neighbor against the other; then, leverage that alliance to reach St. Petersburg and project force beyond the major stalemate line; then, attack the other neighbor to win. England’s major question is which neighbor should perform which role. Regardless, England obviously needs fleets early. But take note of the fact that Paris, Munich, Warsaw, and Moscow are all landlocked supply centers within England’s range in a solo; managing fleet and army balance is critical to victory.
You can sometimes go deep with your ally before backstabbing for the win
Italy is a reasonable long-term target for an Anglo-German alliance that holds up after destroying France. And likewise, getting into Sevastopol and Romania is plausible for England in an Anglo-French alliance that holds up after destroying Germany. Austria, Turkey, and the rest of the Balkans are not realistic in any scenario; England should already win before getting units that far into southern Europe.
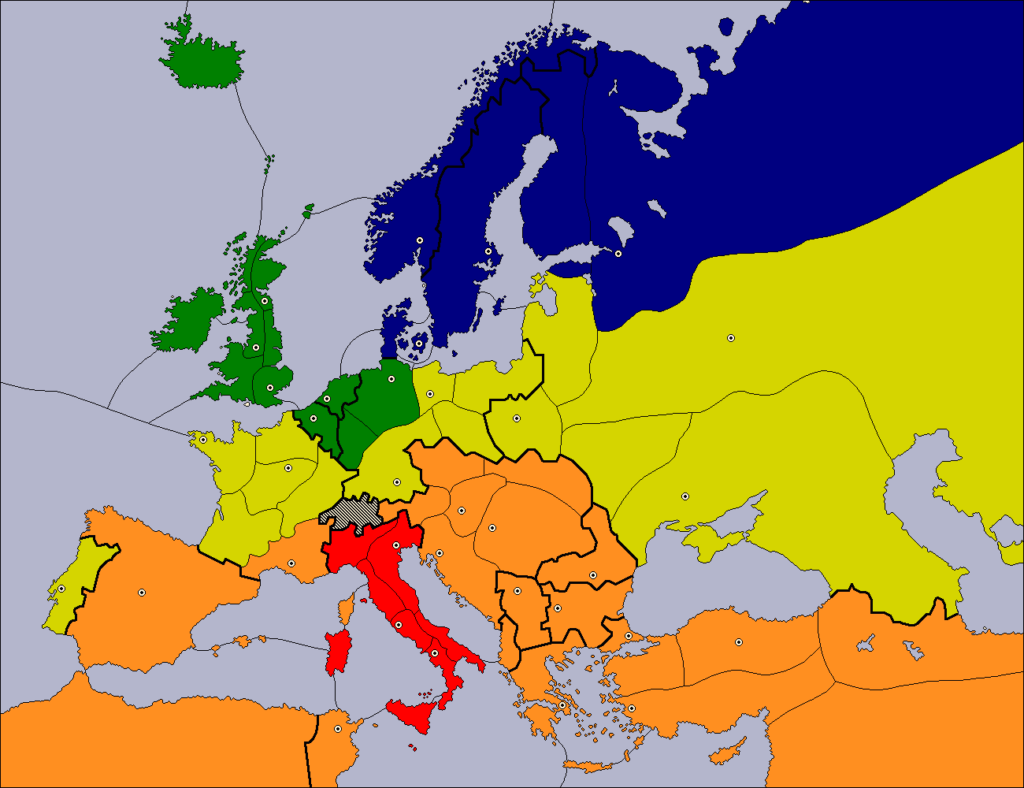
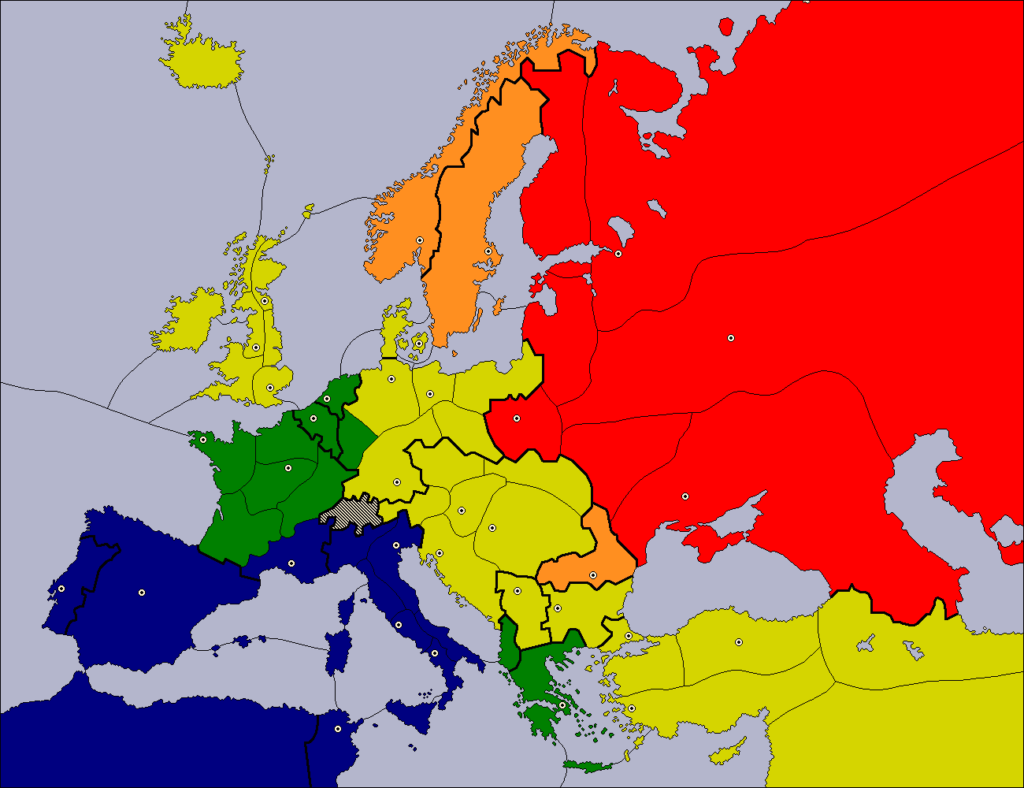
France

Note that the different colors of Germany and England are irrelevant to France’s strategy. This difference is just a quirk of the different alliance dynamics. Like England, France’s biggest early game decision is with which neighbor to negotiate an alliance. Unlike England, though, France plays two very different games depending on the choice of an ally.
England’s centers are “now or never”
When France allies with England, France tends to move its fleets to attack Italy first. That decision gives England time to capture Scandinavia and accumulate a more robust network of fleets. Middle game and endgame attacks on England thus become very difficult. When France wins from this position, it usually does so by evicting England from Germany and overrunning Central Europe with armies, picking up the likes of Warsaw and Vienna.
Germany’s centers can be picked up later
When France allies with Germany, however, France’s fleets go north to conquer England. Germany usually has a maximum of three fleets available to attack Scandinavia and England. Thus, France has a realistic chance to beat Germany at sea, then roll up the entire west. Therefore, England is yellow, and Germany is orange.[8]Basically, France may not take English home centers in some wins. But France will almost always take German home centers in some wins.
A slightly deceptive map…
France’s map is the one map in which I find the color scheme deceptive. Generally, the redder a province, the higher priority its acquisition becomes. However, I would rate England as higher priority for France to acquire, despite not following that pattern. France’s best solo path is to annex England, then press east the way England wanted to press. And the longer France waits on England’s centers, the harder they become to capture.
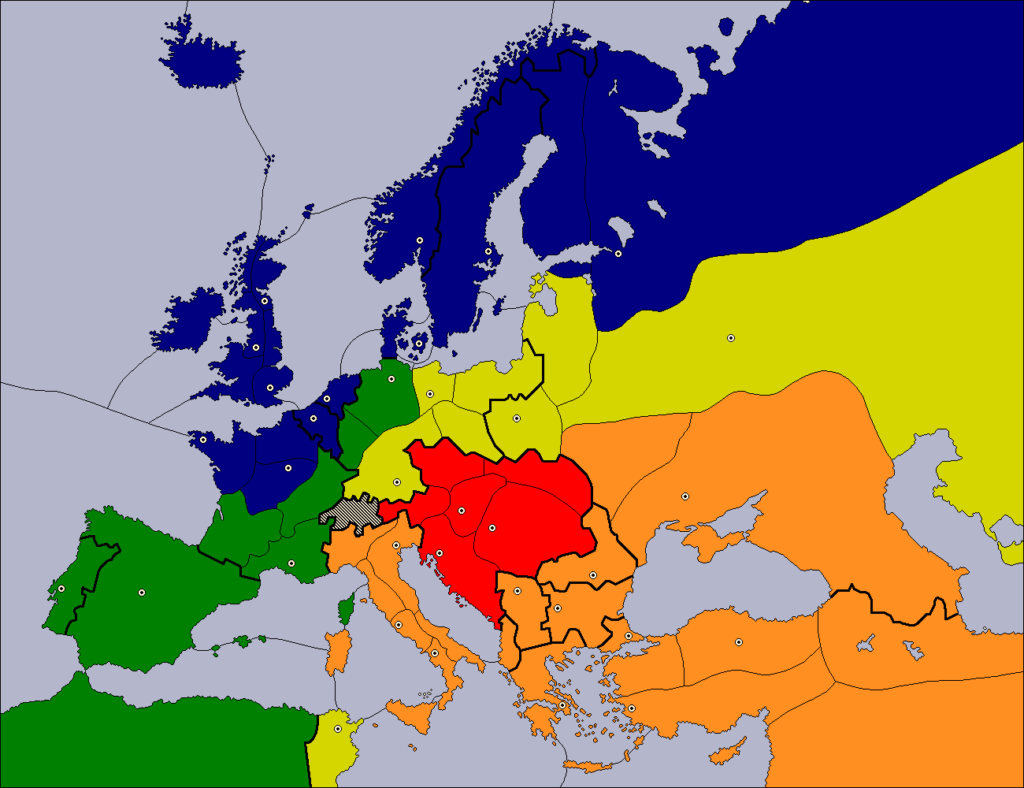
Germany
Germany has a much less linear path to eighteen.
Every alliance has a catch
Germany needs England neutralized or eliminated. But if Germany recruits France and isn’t careful, France can just absorb England. Then, France is too powerful to defeat—an issue when Germany also needs France neutralized or eliminated. These facts lend themselves to an understanding that Russia is Germany’s best ally in the early game. But, not only does a German solo virtually demand annexation of Russia’s expected conquests in Scandinavia; Warsaw and Moscow are also Germany’s best bet to breach the major stalemate line. Italy can be recruited against France, but that route tends to magnify Germany’s difficulty in getting leverage over Iberia. Germany can try to ride with its initial ally long enough to invade Austria and press toward the Balkans; but Germany can struggle to hold off opportunistic betrayals going down this route.
Be vigilant and don’t commit to one plan forever
The moral of this story is that Germany needs to be flexible. There’s no linear, secure route Germany can follow game after game to victory. Germany is in the center of the board and has a lot of options to get to eighteen; keep your eyes open to all the possibilities!
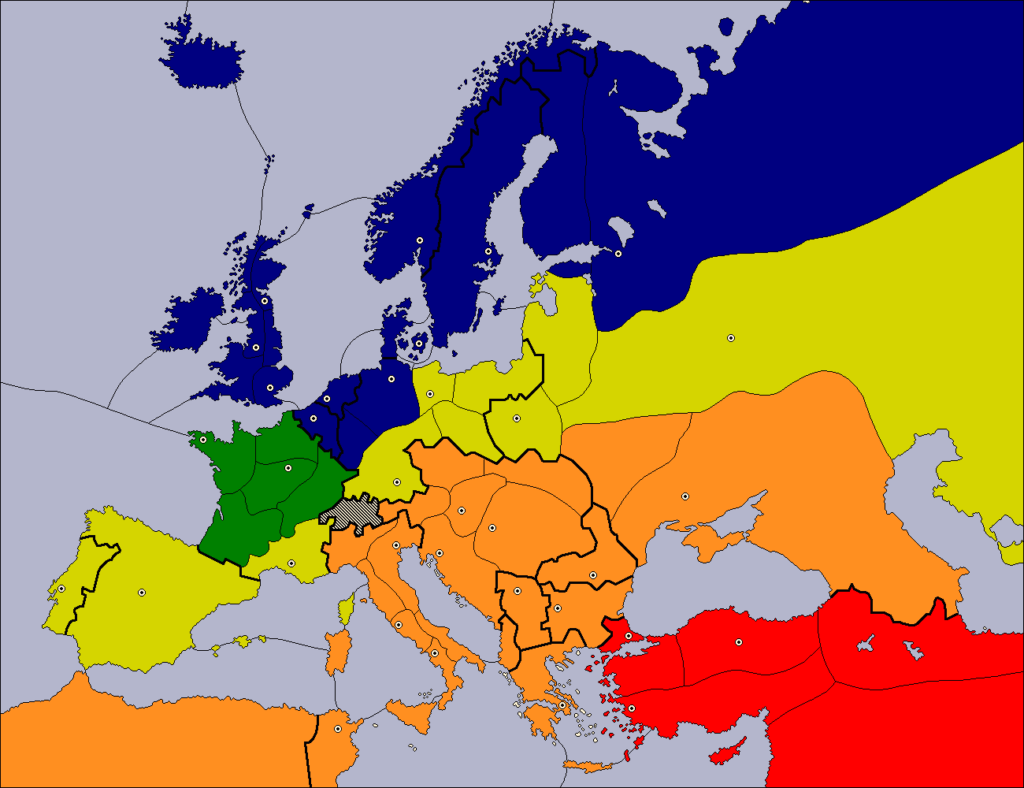
Italy
Like Germany, Italy doesn’t have a consistently useful linear strategy to solo; and the dynamics of its relationships with Austria and Turkey mirror the dynamics of Germany’s relationships with England and France.
For every action, a reaction
Italy needs Austria neutralized or eliminated, and an early attack is the most efficient way to accomplish this task. If Austria is permitted to secure a base of expansion, it becomes much harder to root out. This is much the same as Germany can say about England. But, a straightforward attack frequently results in Turkey becoming too powerful to stop; much as France usually profits from a straightforward attack on England more than Germany does. Russia is a helpful counterweight against Austria if Turkey is targeted first; much as Russia is a useful counterweight against England while Germany targets France first. But, this brings Russia into Italy’s expansion routes, which results in a middle or endgame war between them. Italy has many routes to victory, but most often claims the orange centers, Sevastopol, and Portugal.
Some fun alternatives
If a strong power controls France, and blocks Italy’s final acquisitions, then Italy can try its luck northeast. Berlin, Munich, Moscow, and Warsaw are all feasible options.
But the most fun comes from the opposite case, when France goes down early. Sometimes, Italy can capitalize so thoroughly that Italy absorbs all of France. In these games, pressing deep into England and even Scandinavia (marked blue) is plausible. Italy’s needs in the east are obviously greatly reduced. This path is very rare, but one of the most fun strategies in Diplomacy; you can even run a “Western Lepanto” by sending two fleets north to convoy to Clyde, like you would Syria!
Austria
Austria’s highly limited navy tends to railroad it down the same expansion routes. Consequently, Austria has only nineteen centers that are considered “regular” targets in an Austrian victory: the “eastern” stalemate line centers plus Munich and Berlin. Austria therefore must neutralize or eliminate Italy, Russia, and Turkey to win most games. When allying with Italy or Turkey against the other,[9]Which almost always happens. Austria naturally takes the role of a land power, hoping to press past Berlin and Munich in setting up a solo run. Realistically, Austria usually gets walled off at Berlin and Munich, and then the fighting between Austria and its ally begins.
There is one interesting alternative
The one alliance that sets Austria on a different path is a long-term alliance with Russia. The demands of fighting Turkey and then Italy include that Austria become a naval power in its own right. Austria usually needs 3 fleets to conquer Turkey and control the Ionian Sea. If Austria succeeds at this task, then the higher concentration of fleets leads Austria to use those fleets against France. This fact alone is why Marseilles and Iberia are green instead of blue. But most commonly, Austria has to finesse its way into Turkey and Italy with minimal fleets; and then fight Russia instead of France.
Turkey
Turkey’s heat map is strikingly similar to Italy’s heat map. The big difference obviously is that Turkey can’t realistically claim English and northern French centers. Turkey tends to have one consistent path to victory: ally with Russia; grind through Austria and Italy; breach Mid-Atlantic Ocean; then betray Russia to seize the final centers from northern Austria and Russia proper. In theory Turkey has viable routes involving allying with Austria or Italy; slowly encircling the ally and pressing toward the stalemate lines; then collapsing on the ally from all directions. But in practice, Italy and Austria are wise to this path, and will rarely ally with Turkey from the outset.
Turkey is an interesting country. Its paths to victory are very limited, it frequently faces early hostility from its neighbors, and when it wins, it follows a path that everyone can see coming from a mile away. In theory, it shouldn’t be a very strong country due to this predictability. In practice, Turkey is an insanely strong defensive stalwart. Turkey can often prevail even in dire circumstances just by outlasting its enemies until help arrives from afar. Predictable, but hard to stop—so who cares?
Russia
Russia is an interesting country. It has by far the fewest “orange” provinces on its heat map, but also the largest number of realistic centers to take in a victory. This is the case because Russia is more flexible than any other power. Maybe Russia should have zero orange centers, and the Italian centers should be green; sometimes Russia can win even while being overrun in the north to start. When this happens, Russia conquers its way through Turkey and Austria and overwhelms Italy from there, then retakes St. Petersburg as the last center. Russia has the same overarching objectives at the start of each game: prevent its two northern neighbors and two southern neighbors from allying together against it.
Russia’s overall goal is to leverage its influence on opposite sides of the board to pick up gains on both sides of the board. Then, Russia uses those gains to create armies that can influence either side of the board. This allow Russia to concentrate force on one theater at a time. Successful Russian games look like a steamroller, where Russia makes gains in one theater, builds in the other theater, makes gains in the other theater, and snowballs into an unstoppable wave pressing out on all fronts at once.
There’s More to Come
Over the coming weeks, I will post detailed guides for each of the seven Classic powers.[10]Your Bored Brother: I’ll update this placeholder paragraph to an article index once Eden finishes more posts.
More from Eden’s Diplomacy Dossier:
Footnotes
| ↑1 | In this author’s not-at-all humble opinion. |
|---|---|
| ↑2 | An Elo-derived system for rating Diplomacy players. |
| ↑3 | The site recently fully integrated Ghost Ratings, and there are some consistency issues being resolved that make me unsure what the exact rank is at the time of this writing. |
| ↑4 | You can find a superb visual index to the tactical basics at webDiplomacy here. Their Diplomacy Adjudicator Test Cases page covers all possible situations. |
| ↑5 | ”Press” is a hobby nickname for verbal or written communication between players. “Full press” allows private and public communication. |
| ↑6 | Perhaps better known as gunboat. |
| ↑7 | And not just because he’s been kind enough to host my guide! |
| ↑8 | Basically, France may not take English home centers in some wins. But France will almost always take German home centers in some wins. |
| ↑9 | Which almost always happens. |
| ↑10 | Your Bored Brother: I’ll update this placeholder paragraph to an article index once Eden finishes more posts. |
Very nice guest post!
Thank you my friend! The first of many I hope 🙂